![]()
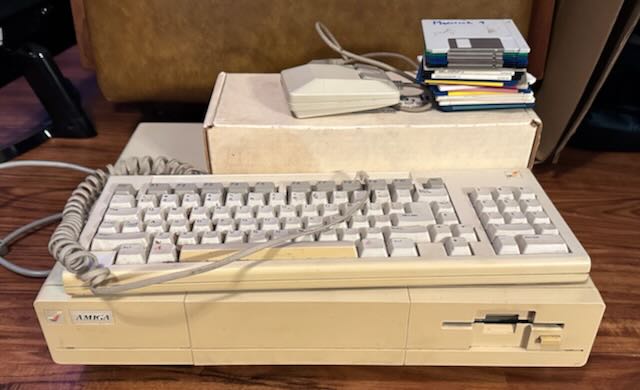
Amiga 1000 Restoration Part 2
Welcome back to another installment of what can I do with my Amiga?
This is the second part of my NTSC Amiga 1000 restoration. If you have not read the first one go back and check that out. Its ok I will wait.
Welcome back.
As you have read a vast majority of the hardware restoration was covered in part 1. This part will focus on adding a RGB2HDMI and a PiStorm my A1000 and what benefit that brings. This upgrade adds a lot of capability but still has a few limitations which will be discussed at the end of the article.
 So what is a RGB2HDMI and a PiStorm?
These are both devices that blend a Raspberry Pi with a custom board that will plug into your Amiga to provide a capability. These are great open source devices that you can source from a builder or even build yourself!
The Raspberry Pi (RPi) is a SBC (Single Board Computer) that comes in multiple form factors. The Raspberry Pi was created to be expandable and tinkered with and all of this is just down right fascinating.
The RGB2HDMI will use a Pi 0 and the PiStorm will use a Pi 3A+
RGB2HDMI
This board provides a fairly easy solution for OCS/ECS Amiga's to connect to an HDMI enabled tv/monitor. Why is this important? Natively the Amiga uses a 15khz video out and this is no longer widly supported on any modern tv/monitor. The HDMI is easily connected to a a HDMI, VGA or DVI monitor which is readily available. I know I know some people really love their CRT monitors and that is totally awesome but for me and this project I am targeting LCD.
Every one should use the solution that works for them and I am sharing what works for me.
Is the RGB2HDMI perfect? Well no but it is really really really good!
PiStorm
This provides a CPU accelerator with several other capabilities as an all in one.
If you have an Amiga and have tried to source a an expansion card to or item to allow a Hard Drive controller, Network cards, Kickstart ROM switchers, RTG (Retargetable Graphics) cards, or RAM expansion you will know that they can be expensive and possibly hard to find.
The PiStorm allows you to use a small RPi and a custom board to give you all of these capabilities with one device. You will greatly enhance your Amiga and a modest cost.
This is available for OCS/ECS Amiga's along with the A1200.
There are 2 classes where as of this writing just isn't there yet. The 3000 and 4000 are on their roadmap and I do hope it gets there some day. That said they have the Zorro cards so other expansions are available even if a little more expensive.
 RGB2HDMI
So how do I install the RGB2HDMI?
RGB2HDMI is a board that will sit between the Denise chip and a RPi that allows the Amiga video to come through the HDMI port on the RPi. With this modification you still get the RGB out on the standard Amiga RGB port as well so this is a win win and the picture looks great.
Check out the GitHub Repo RGB2HDMI as this contains a lot of instructions on setting things up. There are builders where you can get the pre-build from amibay, eBay, tindie, etc. The repo also does a good job of talking you though getting the boards build from a manufacturer such as JLPCB or PCBWay.
I 3D printed a new backplane for my A1000 as I didn't want to modify my cases backplate which ended up being fairly easy as someone released a 3D print to do this. A1000 Backplate I use Jessie Premium PLA 1.75mm x Beige 500 for a close Amiga looking color.
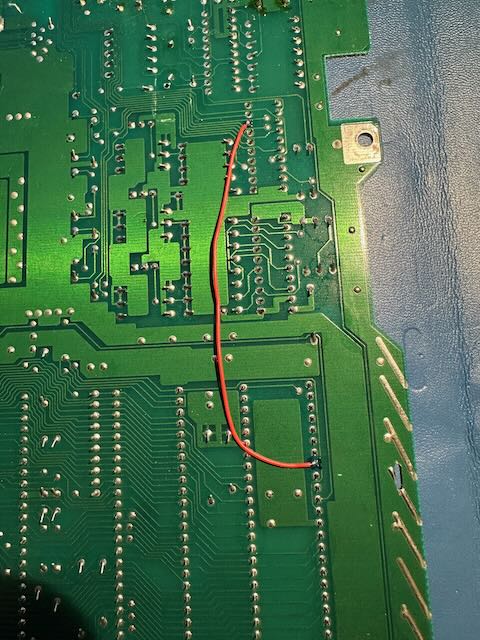
The Amiga 1000 needs a wire connected to the to the Denise chip as sadly the CSYNC signals are not connected at the motherboard.
I tried to use a connector that would grab onto the Denise chip and it was really a pain and kept falling off so I don't recommend that.
I ran a bodge wire to connect these on the motherboard.
This requires you to take the motherboard out of the A1000 and run the wire underneath but it is so much cleaner.
The RGB2HDMI has the option to use 1 or 3 buttons to select different modes depending on what buttons you wire up. I used the single button configuration where you select options based on how long you hold the button down. This took me a little bit to get the hang of it but is pretty simple. 7mm push button switch
Be sure to look at the repo's quick start guide as there are some great Amiga instructions.
- The first copies the Amiga configs to be the default RGB2HDMI configurations.
- The second is set the RGB2HDMI to be in 1 button mode vs 3 button mode.
- The single button mode you have to hold the button down a bit for select but after a few tries you get the hang of it.
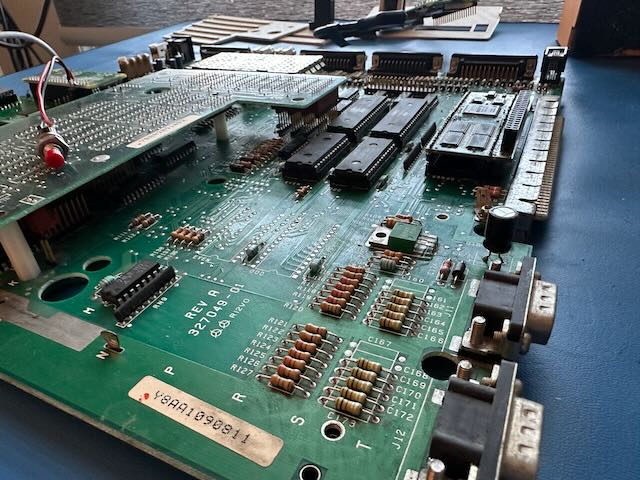
The Amiga A1000 has its Denise in a spot where a special riser board needs to be created so the RGB2HDMI can be put in correctly.
Sadly this board isn't commonly sold by other builders so I had to have my own made. This was my first attempt at using KiCad and getting a board made from JLCPCB and was a little nervous about the process. I also had JLCPCB place most of the components on the board at an extra cost just to make my life easier. I am happy to say the whole process worked out very well.
The Gerbers can be found in the A1000 RGB2HDMI repo from LinuxJedi A1000 Gerbers.
When you power on your Amiga there maybe a few second delay for the RGB2HDMI to startup and be able to see the display. I also changed the configuration to have the RGB2HDMI auto detect my monitor at boot so I don't have to manually select it. The directions on how to do this can be found in the gitrepo / wiki I like to above.
I imagine I have missed something but overall with following the directions the project turned out very well.

PiStorm
What is a PiStorm?
The PiStorm is a little bit of everything!
There are several expansions that where created to plug into the sidecar expansion slot of the A1000 that could add a harddrive, memory, etc.
Now the PiStorm is an inexpensive expansion that can provide all kinds of expansions in a very small package. I know there are some folks that will not like the fact that the RPi is handling a lot of processing and it isn't original hardware. This is a choice you need to make and how much you want to spend on possible expansions to improve your usability.
In my case it makes my A1000 very usable again.
I use the following "expansions"
- 68020/68030 Emulation
- Wifi
- Hard drive
- Kickstart ROMs on PiStorm
This is an amazing amount of expansions in such a small package.
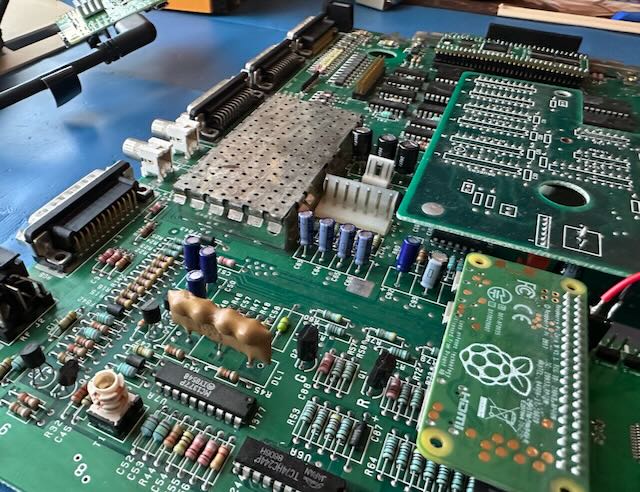
Sadly there is a little space problem inside the A1000 as the PiStorm plugs into the M68000 and that is very close to the floppy drive. Luckily you can get things to just fit with a small modification to the RPi 3+ board. You will need to snip off the RPi mounting hole closest to the floppy drive.
This became my second JLCPCB created board and it went as smoothly as the first.
A thing to keep in mind is you have a minimum of 5 pieces.
There are 2 different images that you can added to the RPi.
The older is the Musashi core with the newer being the Emu68
Musashi
This boots the RPi into a Debian Linux which then runs a couple of services that run on Linux to provide the services to the host Amiga.
I selected the Linux approach as I am a Linux guy and thought it would be neat to have access to Linux from inside the Amiga.
The Linux shares its Wifi by using the A314 emulator to the Amiga. The main service also emulates RTG graphics along with selecting what CPU you want to emulate through the configuration files. Be sure the read the documentation and follow it or things may not do what you want. Be very careful to use the version of Debian Linux that the documentation says to use.
Be sure to install the necessary Amiga utilities which allows you access to the RPi from the Amiga side.
I tried a newer version of Linux but it didn't go well at all and I didn't put the energy into the work necessary to correct.
I don't believe this set of packages are maintained but I do find them very useful.
I have found this plenty fast for me and it feels in the range of an A3000-A4000.
Emu68
This is the currently maintained services and is constantly getting updates.
I did not try to install this or use it other than it exists and it looks super neat. I do recommend taking a look at this option if you are interested in greater speed as the CPU emulation is a lot faster than Musashi.
PiStorm repos
 Challenge
There are some challenges with this upgrade.
I have 2 challenges with this upgrade that still need to be worked around.
The biggest one is that the A1000 still only has 512k of Chip RAM. The PiStorm only adds Fast RAM and can not add Chip RAM. This still proves as a limitation as "newer" programs wanted 1 MB or more of Chip RAM for their applications.
Sadly the Agnus Chip type changed from a DIP to PLCC when the A500 and newer machines where released. This means you can not just replace the Agnus chip with a newer one.
How can one get around this you ask?
Well there is a product out there called a Rejuvenator board for the NTSC version of the A1000. This board replaces the daughter board and gives the capability to put in a full 2 MB Agnus out of an A3000! Granted those Agnus chips are very rare and expensive but there is a Agnus recreation project out there that may fit the bill too.
This boards are fairly rare but there is a recreation project out there so you could make your own.
I have not tried this as of yet and I am unsure if I ever will as I have other Amiga's that do have this capability.
The other challenge is the RTG graphics uses a separate HDMI port then the RGB2HDMI HDMI port which means depending on your graphics mode you have to switch HDMI connectors. This can be adapted with an HDMI switcher and is less of a problem than the Agnus.
 Til next time
This has been a fun project and I learned a lot doing it.
I hope you enjoyed this Amiga adventure with me and looking forward to more in the future for more.